
| |||
|---|---|---|---|
|
|
|
||

UVM SEQUENCE 1
Introduction
A sequence is a series of transaction. User can define the complex stimulus. sequences can be reused, extended, randomized, and combined sequentially and hierarchically in various ways.
For example, for a processor, lets say PUSH_A,PUSH_B,ADD,SUB,MUL,DIV and POP_C are the instructions. If the instructions are generated randomly, then to excursing a meaningful operation like "adding 2 variables" which requires a series of transaction "PUSH_A PUSH_B ADD POP_C " will take longer time. By defining these series of "PUSH_A PUSH_B ADD POP_C ", it would be easy to exercise the DUT.
Advantages of uvm sequences :
 Sequences can be reused.
Stimulus generation is independent of testbench.
Easy to control the generation of transaction.
Sequences can be combined sequentially and hierarchically.
A complete sequence generation requires following 4 classes.
1- Sequence item.
2- Sequence
3- Sequencer
4- Driver
uvm_sequence_item :
User has to define a transaction by extending uvm_sequence_item. uvm_sequence_item class provides the basic functionality for objects, both sequence items and sequences, to operate in the sequence mechanism. For more information about uvm_sequence_item Refer to link
UVM_TRANSACTION
uvm_sequence:
User should extend uvm_sequence class and define the construction of sequence of transactions. These transactions can be directed, constrained randomized or fully randomized. The uvm_sequence class provides the interfaces necessary in order to create streams of sequence items and/or other sequences.
virtual class uvm_sequence #(
type REQ = uvm_sequence_item,
type RSP = REQ
)
uvm_sequencer:
uvm_sequencer is responsible for the coordination between sequence and driver. Sequencer sends the transaction to driver and gets the response from the driver. The response transaction from the driver is optional. When multiple sequences are running in parallel, then sequencer is responsible for arbitrating between the parallel sequences. There are two types of sequencers : uvm_sequencer and uvm_push_sequencer
class uvm_sequencer #(
type REQ = uvm_sequence_item,
type RSP = REQ
)
class uvm_push_sequencer #(
type REQ = uvm_sequence_item,
type RSP = REQ
)
uvm driver:
User should extend uvm_driver class to define driver component. uvm driver is a component that initiate requests for new transactions and drives it to lower level components. There are two types of drivers: uvm_driver and uvm_push_driver.
class uvm_driver #(
type REQ = uvm_sequence_item,
type RSP = REQ
)
class uvm_push_driver #(
type REQ = uvm_sequence_item,
type RSP = REQ
)
In pull mode , uvm_sequencer is connected to uvm_driver , in push mode uvm_push_sequencer is connectd to uvm_push_driver.
uvm_sequencer and uvm_driver are parameterized components with request and response transaction types. REQ and RSP types by default are uvm_sequence_type types. User can specify REQ and RSP of different transaction types. If user specifies only REQ type, then RSP will be REQ type.
Sequence And Driver Communication:
The above image shows how a transaction from a sequence is sent to driver and the response from the driver is sent to sequencer. There are multiple methods called during this operation.
First when the body() method is called
1) A transaction is created using "create()" method. If a transaction is created using "create()" method, then it can be overridden if required using uvm factory.
2) After a transaction is created, wait_for_grant() method is called. This method is blocking method.
3) In the run task of the driver, when "seq_item_port.get_next_item()" is called, then the sequencer un blocks wait_for_grant() method. If more than one sequence is getting executed by sequencer, then based on arbitration rules, un blocks the wait_for_grant() method.
4) After the wait_for_grant() un blocks, then transaction can be randomized, or its properties can be filled directly. Then using the send_request() method, send the transaction to the driver.
5) After calling the send_request() method, "wait_for_item_done()" method is called. This is a blocking method and execution gets blocks at this method call.
6) The transaction which is sent from sequence , in the driver this transaction is available as "seq_item_port.get_next_item(req)" method argument. Then driver can drive this transaction to bus or lower level.
7) Once the driver operations are completed, then by calling "seq_item_port.put(rsp)", wait_for_item_done() method of sequence gest unblocked. Using get_responce(res), the response transaction from driver is taken by sequence and processes it.
After this step, again the steps 1 to 7 are repeated five times.
If a response from driver is not required, then steps 5,6,7 can be skipped and item_done() method from driver should be called as shown in above image.
Simple Example
Lest write an example: This is a simple example of processor instruction. Various instructions which are supported by the processor are PUSH_A,PUSH_B,ADD,SUB,MUL,DIV and POP_C.
Sequence Item
1) Extend uvm_sequence_item and define instruction class.
class instruction extends uvm_sequence_item;
2) Define the instruction as enumerated types and declare a variable of instruction enumerated type.
typedef enum {PUSH_A,PUSH_B,ADD,SUB,MUL,DIV,POP_C} inst_t;
rand inst_t inst;
3) Define operational method using uvm_field_* macros.
`uvm_object_utils_begin(instruction)
`uvm_field_enum(inst_t,inst, UVM_ALL_ON)
`uvm_object_utils_end
4) Define the constructor.
function new (string name = "instruction");
super.new(name);
endfunction
(S) Sequence item code:
class instruction extends uvm_sequence_item;
typedef enum {PUSH_A,PUSH_B,ADD,SUB,MUL,DIV,POP_C} inst_t;
rand inst_t inst;
`uvm_object_utils_begin(instruction)
`uvm_field_enum(inst_t,inst, UVM_ALL_ON)
`uvm_object_utils_end
function new (string name = "instruction");
super.new(name);
endfunction
endclass
Sequence
We will define a operation addition using uvm_sequence. The instruction sequence should be "PUSH A PUSH B ADD POP C".
1) Define a sequence by extending uvm_sequence. Set REQ parameter to "instruction" type.
class operation_addition extends uvm_sequence #(instruction);
2) Define the constructor.
function new(string name="operation_addition");
super.new(name);
endfunction
3) Lets name the sequencer which we will develop is "instruction_sequencer".
Using the `uvm_sequence_utils macro, register the "operation_addition" sequence with "instruction_sequencer" sequencer. This macro adds the sequence to the sequencer list. This macro will also register the sequence for factory overrides.
`uvm_sequence_utils(operation_addition, instruction_sequencer)
4)
In the body() method, first call wait_for_grant(), then construct a transaction and set the instruction enum to PUSH_A . Then send the transaction to driver using send_request() method. Then call the wait_for_item_done() method. Repeat the above steps for other instructions PUSH_B, ADD and POP_C.
For construction of a transaction, we will use the create() method.
virtual task body();
req = instruction::type_id::create("req");
wait_for_grant();
assert(req.randomize() with {
inst == instruction::PUSH_A;
});
send_request(req);
wait_for_item_done();
//get_response(res); This is optional. Not using in this example.
req = instruction::type_id::create("req");
wait_for_grant();
req.inst = instruction::PUSH_B;
send_request(req);
wait_for_item_done();
//get_response(res);
req = instruction::type_id::create("req");
wait_for_grant();
req.inst = instruction::ADD;
send_request(req);
wait_for_item_done();
//get_response(res);
req = instruction::type_id::create("req");
wait_for_grant();
req.inst = instruction::POP_C;
send_request(req);
wait_for_item_done();
//get_response(res);
endtask
(S) Sequence code
class operation_addition extends uvm_sequence #(instruction);
instruction req;
function new(string name="operation_addition");
super.new(name);
endfunction
`uvm_sequence_utils(operation_addition, instruction_sequencer)
virtual task body();
req = instruction::type_id::create("req");
wait_for_grant();
assert(req.randomize() with {
inst == instruction::PUSH_A;
});
send_request(req);
wait_for_item_done();
//get_response(res); This is optional. Not using in this example.
req = instruction::type_id::create("req");
wait_for_grant();
req.inst = instruction::PUSH_B;
send_request(req);
wait_for_item_done();
//get_response(res);
req = instruction::type_id::create("req");
wait_for_grant();
req.inst = instruction::ADD;
send_request(req);
wait_for_item_done();
//get_response(res);
req = instruction::type_id::create("req");
wait_for_grant();
req.inst = instruction::POP_C;
send_request(req);
wait_for_item_done();
//get_response(res);
endtask
endclass
Sequencer:
uvm_sequence has a property called default_sequence. Default sequence is a sequence which will be started automatically. Using set_config_string, user can override the default sequence to any user defined sequence, so that when a sequencer is started, automatically a user defined sequence will be started. If over rides are not done with user defined sequence, then a random transaction are generated. Using "start_default_sequence()" method, "default_sequence" can also be started.
uvm sequencer has seq_item_export and res_export tlm ports for connecting to uvm driver.
1) Define instruction_sequencer by extending uvm_sequencer.
class instruction_sequencer extends uvm_sequencer #(instruction);
2) Define the constructor.
Inside the constructor, place the macro `uvm_update_sequence_lib_and_item().
This macro creates 3 predefined sequences. We will discuss about the predefined sequences in next section.
function new (string name, uvm_component parent);
super.new(name, parent);
`uvm_update_sequence_lib_and_item(instruction)
endfunction
3) Place the uvm_sequencer_utils macro. This macro registers the sequencer for factory overrides.
`uvm_sequencer_utils(instruction_sequencer)
(S) Sequencer Code;
class instruction_sequencer extends uvm_sequencer #(instruction);
function new (string name, uvm_component parent);
super.new(name, parent);
`uvm_update_sequence_lib_and_item(instruction)
endfunction
`uvm_sequencer_utils(instruction_sequencer)
endclass
Driver:
uvm_driver is a class which is extended from uvm_componenet. This driver is used in pull mode. Pull mode means, driver pulls the transaction from the sequencer when it requires.
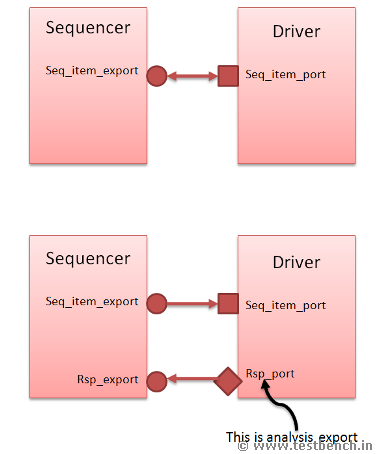
uvm driver has 2 TLM ports.
1) Seq_item_port: To get a item from sequencer, driver uses this port. Driver can also send response back using this port.
2) Rsp_port : This can also be used to send response back to sequencer.
(S)Seq_item_port methods:

Lets implement a driver:
1) Define a driver which takes the instruction from the sequencer and does the processing. In this example we will just print the instruction type and wait for some delay.
class instruction_driver extends uvm_driver #(instruction);
2) Place the uvm_component_utils macro to define virtual methods like get_type_name and create.
`uvm_component_utils(instruction_driver)
3) Define Constructor method.
function new (string name, uvm_component parent);
super.new(name, parent);
endfunction
4) Define the run() method. Run() method is executed in the "run phase". In this methods, transactions are taken from the sequencer and drive them on to dut interface or to other components.
Driver class has a port "seq_item_port". Using the method seq_item_port.get_next_item(), get the transaction from the sequencer and process it. Once the processing is done, using the item_done() method, indicate to the sequencer that the request is completed. In this example, after taking the transaction, we will print the transaction and wait for 10 units time.
task run ();
while(1) begin
seq_item_port.get_next_item(req);
$display("%0d: Driving Instruction %s",$time,req.inst.name());
#10;
seq_item_port.item_done();
end
endtask
endclass
(S)Driver class code:
class instruction_driver extends uvm_driver #(instruction);
// Provide implementations of virtual methods such as get_type_name and create
`uvm_component_utils(instruction_driver)
// Constructor
function new (string name, uvm_component parent);
super.new(name, parent);
endfunction
task run ();
forever begin
seq_item_port.get_next_item(req);
$display("%0d: Driving Instruction %s",$time,req.inst.name());
#10;
// rsp.set_id_info(req); These two steps are required only if
// seq_item_port.put(esp); responce needs to be sent back to sequence
seq_item_port.item_done();
end
endtask
endclass
Driver And Sequencer Connectivity:
Deriver and sequencer are connected using TLM. uvm_driver has seq_item_port which is used to get the transaction from uvm sequencer. This port is connected to uvm_sequencer seq_item_export Using "<driver>.seq_item_port.connect(<sequencer>.seq_item_export);" driver and sequencer can be connected. Simillarly "res_port" of driver which is used to send response from driver to sequencer is connected to "res_export" of the sequencer using ""<driver>.res_port.connect(<sequencer>.res_export);".
Testcase:
This testcase is used only for the demo purpose of this tutorial session. Actually, the sequencer and the driver and instantiated and their ports are connected in a agent component and used. Lets implement a testcase
1) Take instances of sequencer and driver and construct both components.
sequencer = new("sequencer", null);
sequencer.build();
driver = new("driver", null);
driver.build();
2)
Connect the seq_item_export to the drivers seq_item_port.
driver.seq_item_port.connect(sequencer.seq_item_export);
3) Using set_confg_string() method, set the default sequence of the sequencer to "operation_addition". Operation_addition is the sequence which we defined previous.
set_config_string("sequencer", "default_sequence", "operation_addition");
4) Using the start_default_sequence() method of the sequencer, start the default sequence of the sequencer. In the previous step we configured the addition operation as default sequene. When you run the simulation, you will see the PUSH_A,PUSH_B ADD and POP_C series of transaction.
sequencer.start_default_sequence();
(S) Testcase Code:
module test;
instruction_sequencer sequencer;
instruction_driver driver;
initial begin
set_config_string("sequencer", "default_sequence", "operation_addition");
sequencer = new("sequencer", null);
sequencer.build();
driver = new("driver", null);
driver.build();
driver.seq_item_port.connect(sequencer.seq_item_export);
sequencer.print();
fork
begin
run_test();
sequencer.start_default_sequence();
end
#2000 global_stop_request();
join
end
endmodule
(S)Download the example:
uvm_basic_sequence.tar
Browse the code in uvm_basic_sequence.tar
(S) Command to simulate
VCS Users : make vcs
Questa Users: make questa
(S)Log file Output
UVM_INFO @ 0 [RNTST] Running test ...
0: Driving Instruction PUSH_A
10: Driving Instruction PUSH_B
20: Driving Instruction ADD
30: Driving Instruction POP_C
From the above log , we can see that transactions are generates as we defined in uvm sequence.
Introduction
A sequence is a series of transaction. User can define the complex stimulus. sequences can be reused, extended, randomized, and combined sequentially and hierarchically in various ways.
For example, for a processor, lets say PUSH_A,PUSH_B,ADD,SUB,MUL,DIV and POP_C are the instructions. If the instructions are generated randomly, then to excursing a meaningful operation like "adding 2 variables" which requires a series of transaction "PUSH_A PUSH_B ADD POP_C " will take longer time. By defining these series of "PUSH_A PUSH_B ADD POP_C ", it would be easy to exercise the DUT.
Advantages of uvm sequences :
Sequences can be reused.
Stimulus generation is independent of testbench.
Easy to control the generation of transaction.
Sequences can be combined sequentially and hierarchically.
A complete sequence generation requires following 4 classes.
1- Sequence item.
2- Sequence
3- Sequencer
4- Driver
uvm_sequence_item :
User has to define a transaction by extending uvm_sequence_item. uvm_sequence_item class provides the basic functionality for objects, both sequence items and sequences, to operate in the sequence mechanism. For more information about uvm_sequence_item Refer to link
UVM_TRANSACTION
uvm_sequence:
User should extend uvm_sequence class and define the construction of sequence of transactions. These transactions can be directed, constrained randomized or fully randomized. The uvm_sequence class provides the interfaces necessary in order to create streams of sequence items and/or other sequences.
virtual class uvm_sequence #(
type REQ = uvm_sequence_item,
type RSP = REQ
)
uvm_sequencer:
uvm_sequencer is responsible for the coordination between sequence and driver. Sequencer sends the transaction to driver and gets the response from the driver. The response transaction from the driver is optional. When multiple sequences are running in parallel, then sequencer is responsible for arbitrating between the parallel sequences. There are two types of sequencers : uvm_sequencer and uvm_push_sequencer
class uvm_sequencer #(
type REQ = uvm_sequence_item,
type RSP = REQ
)
class uvm_push_sequencer #(
type REQ = uvm_sequence_item,
type RSP = REQ
)
uvm driver:
User should extend uvm_driver class to define driver component. uvm driver is a component that initiate requests for new transactions and drives it to lower level components. There are two types of drivers: uvm_driver and uvm_push_driver.
class uvm_driver #(
type REQ = uvm_sequence_item,
type RSP = REQ
)
class uvm_push_driver #(
type REQ = uvm_sequence_item,
type RSP = REQ
)
In pull mode , uvm_sequencer is connected to uvm_driver , in push mode uvm_push_sequencer is connectd to uvm_push_driver.
uvm_sequencer and uvm_driver are parameterized components with request and response transaction types. REQ and RSP types by default are uvm_sequence_type types. User can specify REQ and RSP of different transaction types. If user specifies only REQ type, then RSP will be REQ type.
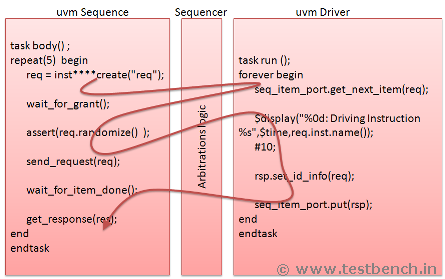
Sequence And Driver Communication:
The above image shows how a transaction from a sequence is sent to driver and the response from the driver is sent to sequencer. There are multiple methods called during this operation.
First when the body() method is called
1) A transaction is created using "create()" method. If a transaction is created using "create()" method, then it can be overridden if required using uvm factory.
2) After a transaction is created, wait_for_grant() method is called. This method is blocking method.
3) In the run task of the driver, when "seq_item_port.get_next_item()" is called, then the sequencer un blocks wait_for_grant() method. If more than one sequence is getting executed by sequencer, then based on arbitration rules, un blocks the wait_for_grant() method.
4) After the wait_for_grant() un blocks, then transaction can be randomized, or its properties can be filled directly. Then using the send_request() method, send the transaction to the driver.
5) After calling the send_request() method, "wait_for_item_done()" method is called. This is a blocking method and execution gets blocks at this method call.
6) The transaction which is sent from sequence , in the driver this transaction is available as "seq_item_port.get_next_item(req)" method argument. Then driver can drive this transaction to bus or lower level.
7) Once the driver operations are completed, then by calling "seq_item_port.put(rsp)", wait_for_item_done() method of sequence gest unblocked. Using get_responce(res), the response transaction from driver is taken by sequence and processes it.
After this step, again the steps 1 to 7 are repeated five times.
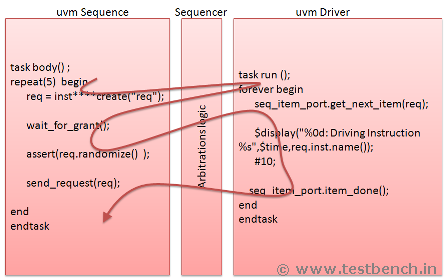
If a response from driver is not required, then steps 5,6,7 can be skipped and item_done() method from driver should be called as shown in above image.
Simple Example
Lest write an example: This is a simple example of processor instruction. Various instructions which are supported by the processor are PUSH_A,PUSH_B,ADD,SUB,MUL,DIV and POP_C.
Sequence Item
1) Extend uvm_sequence_item and define instruction class.
class instruction extends uvm_sequence_item;
2) Define the instruction as enumerated types and declare a variable of instruction enumerated type.
typedef enum {PUSH_A,PUSH_B,ADD,SUB,MUL,DIV,POP_C} inst_t;
rand inst_t inst;
3) Define operational method using uvm_field_* macros.
`uvm_object_utils_begin(instruction)
`uvm_field_enum(inst_t,inst, UVM_ALL_ON)
`uvm_object_utils_end
4) Define the constructor.
function new (string name = "instruction");
super.new(name);
endfunction
(S) Sequence item code:
class instruction extends uvm_sequence_item;
typedef enum {PUSH_A,PUSH_B,ADD,SUB,MUL,DIV,POP_C} inst_t;
rand inst_t inst;
`uvm_object_utils_begin(instruction)
`uvm_field_enum(inst_t,inst, UVM_ALL_ON)
`uvm_object_utils_end
function new (string name = "instruction");
super.new(name);
endfunction
endclass
Sequence
We will define a operation addition using uvm_sequence. The instruction sequence should be "PUSH A PUSH B ADD POP C".
1) Define a sequence by extending uvm_sequence. Set REQ parameter to "instruction" type.
class operation_addition extends uvm_sequence #(instruction);
2) Define the constructor.
function new(string name="operation_addition");
super.new(name);
endfunction
3) Lets name the sequencer which we will develop is "instruction_sequencer".
Using the `uvm_sequence_utils macro, register the "operation_addition" sequence with "instruction_sequencer" sequencer. This macro adds the sequence to the sequencer list. This macro will also register the sequence for factory overrides.
`uvm_sequence_utils(operation_addition, instruction_sequencer)
4)
In the body() method, first call wait_for_grant(), then construct a transaction and set the instruction enum to PUSH_A . Then send the transaction to driver using send_request() method. Then call the wait_for_item_done() method. Repeat the above steps for other instructions PUSH_B, ADD and POP_C.
For construction of a transaction, we will use the create() method.
virtual task body();
req = instruction::type_id::create("req");
wait_for_grant();
assert(req.randomize() with {
inst == instruction::PUSH_A;
});
send_request(req);
wait_for_item_done();
//get_response(res); This is optional. Not using in this example.
req = instruction::type_id::create("req");
wait_for_grant();
req.inst = instruction::PUSH_B;
send_request(req);
wait_for_item_done();
//get_response(res);
req = instruction::type_id::create("req");
wait_for_grant();
req.inst = instruction::ADD;
send_request(req);
wait_for_item_done();
//get_response(res);
req = instruction::type_id::create("req");
wait_for_grant();
req.inst = instruction::POP_C;
send_request(req);
wait_for_item_done();
//get_response(res);
endtask
(S) Sequence code
class operation_addition extends uvm_sequence #(instruction);
instruction req;
function new(string name="operation_addition");
super.new(name);
endfunction
`uvm_sequence_utils(operation_addition, instruction_sequencer)
virtual task body();
req = instruction::type_id::create("req");
wait_for_grant();
assert(req.randomize() with {
inst == instruction::PUSH_A;
});
send_request(req);
wait_for_item_done();
//get_response(res); This is optional. Not using in this example.
req = instruction::type_id::create("req");
wait_for_grant();
req.inst = instruction::PUSH_B;
send_request(req);
wait_for_item_done();
//get_response(res);
req = instruction::type_id::create("req");
wait_for_grant();
req.inst = instruction::ADD;
send_request(req);
wait_for_item_done();
//get_response(res);
req = instruction::type_id::create("req");
wait_for_grant();
req.inst = instruction::POP_C;
send_request(req);
wait_for_item_done();
//get_response(res);
endtask
endclass
Sequencer:
uvm_sequence has a property called default_sequence. Default sequence is a sequence which will be started automatically. Using set_config_string, user can override the default sequence to any user defined sequence, so that when a sequencer is started, automatically a user defined sequence will be started. If over rides are not done with user defined sequence, then a random transaction are generated. Using "start_default_sequence()" method, "default_sequence" can also be started.
uvm sequencer has seq_item_export and res_export tlm ports for connecting to uvm driver.
1) Define instruction_sequencer by extending uvm_sequencer.
class instruction_sequencer extends uvm_sequencer #(instruction);
2) Define the constructor.
Inside the constructor, place the macro `uvm_update_sequence_lib_and_item().
This macro creates 3 predefined sequences. We will discuss about the predefined sequences in next section.
function new (string name, uvm_component parent);
super.new(name, parent);
`uvm_update_sequence_lib_and_item(instruction)
endfunction
3) Place the uvm_sequencer_utils macro. This macro registers the sequencer for factory overrides.
`uvm_sequencer_utils(instruction_sequencer)
(S) Sequencer Code;
class instruction_sequencer extends uvm_sequencer #(instruction);
function new (string name, uvm_component parent);
super.new(name, parent);
`uvm_update_sequence_lib_and_item(instruction)
endfunction
`uvm_sequencer_utils(instruction_sequencer)
endclass
Driver:
uvm_driver is a class which is extended from uvm_componenet. This driver is used in pull mode. Pull mode means, driver pulls the transaction from the sequencer when it requires.
uvm driver has 2 TLM ports.
1) Seq_item_port: To get a item from sequencer, driver uses this port. Driver can also send response back using this port.
2) Rsp_port : This can also be used to send response back to sequencer.
(S)Seq_item_port methods:
Lets implement a driver:
1) Define a driver which takes the instruction from the sequencer and does the processing. In this example we will just print the instruction type and wait for some delay.
class instruction_driver extends uvm_driver #(instruction);
2) Place the uvm_component_utils macro to define virtual methods like get_type_name and create.
`uvm_component_utils(instruction_driver)
3) Define Constructor method.
function new (string name, uvm_component parent);
super.new(name, parent);
endfunction
4) Define the run() method. Run() method is executed in the "run phase". In this methods, transactions are taken from the sequencer and drive them on to dut interface or to other components.
Driver class has a port "seq_item_port". Using the method seq_item_port.get_next_item(), get the transaction from the sequencer and process it. Once the processing is done, using the item_done() method, indicate to the sequencer that the request is completed. In this example, after taking the transaction, we will print the transaction and wait for 10 units time.
task run ();
while(1) begin
seq_item_port.get_next_item(req);
$display("%0d: Driving Instruction %s",$time,req.inst.name());
#10;
seq_item_port.item_done();
end
endtask
endclass
(S)Driver class code:
class instruction_driver extends uvm_driver #(instruction);
// Provide implementations of virtual methods such as get_type_name and create
`uvm_component_utils(instruction_driver)
// Constructor
function new (string name, uvm_component parent);
super.new(name, parent);
endfunction
task run ();
forever begin
seq_item_port.get_next_item(req);
$display("%0d: Driving Instruction %s",$time,req.inst.name());
#10;
// rsp.set_id_info(req); These two steps are required only if
// seq_item_port.put(esp); responce needs to be sent back to sequence
seq_item_port.item_done();
end
endtask
endclass
Driver And Sequencer Connectivity:
Deriver and sequencer are connected using TLM. uvm_driver has seq_item_port which is used to get the transaction from uvm sequencer. This port is connected to uvm_sequencer seq_item_export Using "<driver>.seq_item_port.connect(<sequencer>.seq_item_export);" driver and sequencer can be connected. Simillarly "res_port" of driver which is used to send response from driver to sequencer is connected to "res_export" of the sequencer using ""<driver>.res_port.connect(<sequencer>.res_export);".
Testcase:
This testcase is used only for the demo purpose of this tutorial session. Actually, the sequencer and the driver and instantiated and their ports are connected in a agent component and used. Lets implement a testcase
1) Take instances of sequencer and driver and construct both components.
sequencer = new("sequencer", null);
sequencer.build();
driver = new("driver", null);
driver.build();
2)
Connect the seq_item_export to the drivers seq_item_port.
driver.seq_item_port.connect(sequencer.seq_item_export);
3) Using set_confg_string() method, set the default sequence of the sequencer to "operation_addition". Operation_addition is the sequence which we defined previous.
set_config_string("sequencer", "default_sequence", "operation_addition");
4) Using the start_default_sequence() method of the sequencer, start the default sequence of the sequencer. In the previous step we configured the addition operation as default sequene. When you run the simulation, you will see the PUSH_A,PUSH_B ADD and POP_C series of transaction.
sequencer.start_default_sequence();
(S) Testcase Code:
module test;
instruction_sequencer sequencer;
instruction_driver driver;
initial begin
set_config_string("sequencer", "default_sequence", "operation_addition");
sequencer = new("sequencer", null);
sequencer.build();
driver = new("driver", null);
driver.build();
driver.seq_item_port.connect(sequencer.seq_item_export);
sequencer.print();
fork
begin
run_test();
sequencer.start_default_sequence();
end
#2000 global_stop_request();
join
end
endmodule
(S)Download the example:
uvm_basic_sequence.tar
Browse the code in uvm_basic_sequence.tar
(S) Command to simulate
VCS Users : make vcs
Questa Users: make questa
(S)Log file Output
UVM_INFO @ 0 [RNTST] Running test ...
0: Driving Instruction PUSH_A
10: Driving Instruction PUSH_B
20: Driving Instruction ADD
30: Driving Instruction POP_C
From the above log , we can see that transactions are generates as we defined in uvm sequence.
Index
Introduction
Uvm Testbench
Uvm Reporting
Uvm Transaction
Uvm Configuration
Uvm Factory
Uvm Sequence 1
Uvm Sequence 2
Uvm Sequence 3
Uvm Sequence 4
Uvm Sequence 5
Uvm Sequence 6
Uvm Tlm 1
Uvm Tlm 2
Uvm Callback
Report a Bug or Comment on This section - Your input is what keeps Testbench.in improving with time!